May
There are several steps involved in the garlic growing process. These are the steps to planting and growing your garlic and they include:
- a) Preparing your garlic and garden or field patch for growing
- i. Prepping
- ii. Planting
- iii. Spacing
- iv. Timing
- b) Growing your garlic
- i. Weeding and Watering
- ii. Scape removal
- c) Harvesting and Curing
- i. Timing
- ii. Harvesting
- iii. Curing
- iv. Storage
PREPARING
PREPPING
The first step in planting and growing your garlic is a plant that does not grow from true seed. More helpful information can be found at https://www.almanac.com/plant/garlic To plant, you take a garlic bulb and separate all the cloves. The best way to do this with hard-neck garlic, especially if you are planting a large garden or farm, is to turn the bulb upside down and give it a whack on a hard unmovable surface, and if you are holding the bulb just the right way the stem should slide up through your fingers and the cloves will be left on the table. Consider wearing a glove if you are planning on cracking a large number of bulbs.
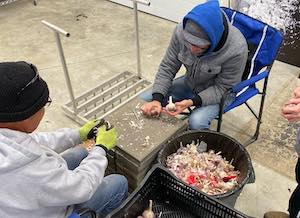
Once you have the cloves, you will want to pick the largest cloves and check to make sure they show no signs of damage, disease, virus, mould or fungus from improper curing and storage. If you find any of the above, do not plant them, but carefully discard them and wash your hands so that you do not spread it to the other cloves you are about to plant. With healthy, large bulbs you will find that you can probably plant all or most of the cloves. All the remaining cloves, if any, should not be discarded, but used for eating or other purposes. They are just as healthy and tasty as the large cloves but if small, they will not have enough mass to feed the new bulb and will grow into a small bulb rather than a large one. Once these cloves are planted, they’ll grow and become clones of the parent bulb
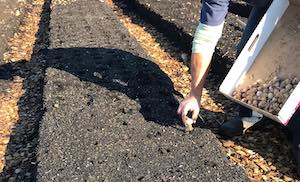
PLANTING
When planting the clove, make sure to put it into the ground with the pointy end up and the basil plate (the bottom) down. The clove will develop roots out of the basil plate and leaves that form around the clove and emerge at the pointy, top side. If you plant the clove upside down, it will likely survive, but the leaves will reroute themselves around the clove in order to find the surface of the ground. This will end up giving you a rather misshapen and ugly bulb. On our farm, we plant our cloves approximately three inches deep
SPACING
There are a number of different things to consider when you determine the spacing you will use when planting. Garlic is a big feeder, so enough space is important so the plants are not competing with each other for nutrients. Next, you will have to consider the space you have to grow in and the bulb count you would like to achieve from that space.
If you have enough room, you probably should plant your rows about 8” to 12” apart, and 8” between the plants. We plant with 6” row spacing and 6” between plants as we do not have unlimited room to plant in, and the compost we grow in is very rich in nitrogen and other nutrients.
TIMING
Your timing is going to vary depending on your location and growing region. A general rule is to aim to plant early enough such that your garlic has a chance to develop a good root system before winter hits, but not yet sprout green leaves. Most growers in Canada will plant between mid-September to the end of November, depending on their growing region. We are located in Chilliwack, B.C. in the eastern end of the Fraser Valley, which puts us in the temperate Zone 8. Our winters are generally pretty mild. We try to plant between the last week of October and the second week of November.
Some growers will plant in spring instead of fall. We have never tried to grow spring garlic, and so cannot comment on how successful that might be.
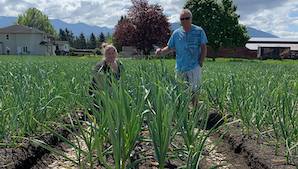
GROWING YOUR GARLIC
WEEDING AND WATERING
The next step in planting and growing your garlic which is probably one of the easiest crops to grow. One of the biggest and most time consuming jobs you will have is weeding; garlic does not do well when it is in competition with weeds. If you are practicing no-till farming, like we do, the weeding job is much easier but still needs to be done. No matter what type of farming or gardening you are doing, take care not to damage the garlic roots when pulling those pesky weeds.
Garlic also likes to be consistently watered. The perfect situation would probably be about half an inch of water a week all at once and then no rain again for another week, but we all know that is not what normally happens. It is better to under water than over water, but do not let it go through a long dry spell without water. The amount of water it needs will vary somewhat depending on the type of soil you are growing in. If it is a sandy loam that drains really well, you will need more. We grow our garlic in 100% organic compost which drains well while still maintaining some moisture .
Around 7 to 8 weeks before harvest, if it is hot and dry, you may want to increase your watering to about one inch per week until 3 weeks or so before harvest when you should quit watering altogether. This will send a signal to the plant to accelerate the bulbing process and reduce the possibility of moulds or fungus that might try and attack the plant. Of course the dates of all this are dependent on your growing region.
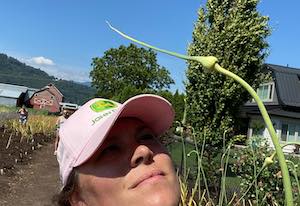
SCAPE REMOVAL
An important step in planting and growing your garlic is knowing the hard-neck garlic will start growing a scape in late spring usually around the end of May. The scapes will shoot up from the centre of the last set of leaves with an umbel on the end. This scape is garlics version of a flowering reproduction process. If left to complete this process, the garlic plant will grow bulbils within the umbel. Bulbils are small clones of the garlic plant itself. Unless you plan to grow garlic from these bulbils, you should remove the scape once it has completely curled once or twice, but before it starts to uncurl. This should be done for two reasons: the scapes are edible and there is a market for them, and more importantly, it will divert all the energy in the garlic plant to growing the bulb instead of producing a flowering umbel which should result in a larger bulb.
HARVESTING AND CURING
TIMING
These are the remaining steps in planting and growing your garlic. It is important to try and harvest your garlic at just the right time. Of course, bulbs will continue to grow as long as the leaves are green, but growers will need to try and find the right balance between bulb growth and leaf deterioration. Try and harvest when the leaves have started dying and turning brown from the bottom up. Each leaf is a wrapper on the bulb. For the best results in handling and storage longevity, you should pull the bulb out of the ground when 50% of the leaves have turned brown and 50% remain green. This roughly translates to about 5 or 6 remaining green leaves. If you are growing multiple different types of hard-neck garlic, you need to monitor them individually as some types will be ready earlier or later than others. We also watch the weather as it is desirable to harvest after a reasonable dry spell.
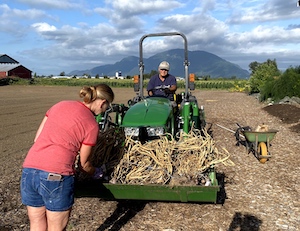
HARVESTING
We like to pull the garlic, and weather permitting, leave them laying on the ground for as much as four days. If it is very sunny and warm when pulling the garlic, lay them down so the leaves of one plant cover the bulb on another plant so the sun does not burn it. This will kick start the drying process and allow much of the dirt to fall off of the bulb and roots and you will end up with a cleaner bulb.
We gather all the bulbs and hang them in bunches of 6 to 10 depending on size to dry out of direct sunlight. Lots of air movement is desirable. If you are drying a lot of garlic inside a building you should have enough fans to insure good air movement in and around all the garlic. The drying and curing process will generally take two to three weeks.
CURING
Once the garlic has cured, it is time to cut it down and clean it, and if you are farming garlic for sale, to grade it. We knock any remaining dirt off the roots, twist them and trim them to about a quarter of an inch. We cut the stalks off two inches above the bulbs, and if we find any bulbs that are soft or look like they have mould we will discard them immediately. At this point we size them and clean them up for sale. Cleaning them up just means lightly brushing off any excess dirt. We do not wash bulbs as we believe that just adds an opportunity for the bulbs to mould while in storage.
On our farm, we strive to deliver the best quality we can. With this in mind, when we size our garlic, we make sure to size from all directions. In order to meet our size criteria, each bulb is hand sized to make sure it fits from every.single.angle!
STORAGE
You have now spent a lot of time and effort planting and growing your garlic. Now the garlic has cured, and been cleaned and sized, we have found that storing it loosely in baskets that provide air flow is best. Garlic is best stored between 10C and 20C. Anything below 10C could signal the garlic to begin sprouting, and anything over 20C could cause premature dehydration. On our farm, we store the garlic in well-vented plastic baskets at a steady temperature of 13C.
The length a given garlic variety will last in storage is dependent on the heritage of the garlic cultivar. As a rule, Porcelains store the longest, with Rocambole storing the shortest amount of time.
Here is a basic table of approximate storage life:
* storage life is highly dependent on storage conditions*
| Cultivar | Storage life |
| Porcelain | 7-9 months |
| Marble Purple Stripe | 5-6 months |
| Uncategorized | 5-6 months |
| Rocambole | 4-6 months |
Overall, this blog post is a valuable resource for both beginner and experienced gardeners looking to grow garlic. It covers all the essential aspects of garlic cultivation and provides practical advice for achieving optimal results. I’ll definitely be referring back to this blog as I embark on my own garlic-growing journey. Well done!